Home Page → App Listing
Add To Collection Modal
The Add to collection modal appears when user clicks the "+" icon on the Individual app listing page, or the App block that will appear inside the feed.

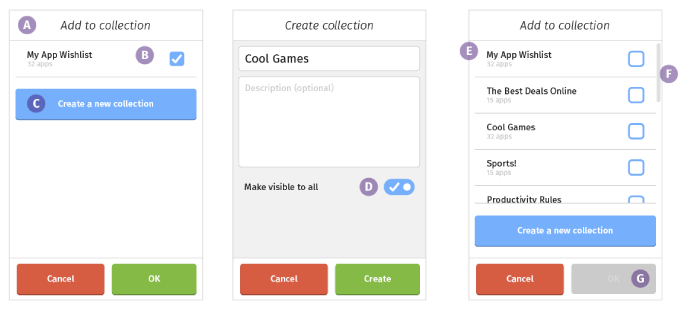
- Add to collection modal
Modal title should be vertically centered on the screen - List of collections – one item "My App Wishlist" should be selected by default.
- Create a Collection button
Selecting this button opens the Create collection modal - Make visible to all
User can choose to make the collection publicly visible on the Marketplace. Visibility should be turned on by default. - List of collections – multiple items
- "My App Wishlist" should always be item #1 on the list.
- Collections should be listed from most recently created to oldest.
- No collection should be selected by default.
- An app may be added to multiple collections.
- Scroll Bar
If there are more than 4 collections on the list, scroll bar should appear. - OK Button
If no collection is selected, the "OK" button should be deactivated.
List of collections – general behavior
- Every collection should include the number of apps currently inside it.
- The entire collection line item should be a touch target
- When a line item is selected, the box to the right should be checkmarked
Add App To Existing Collection

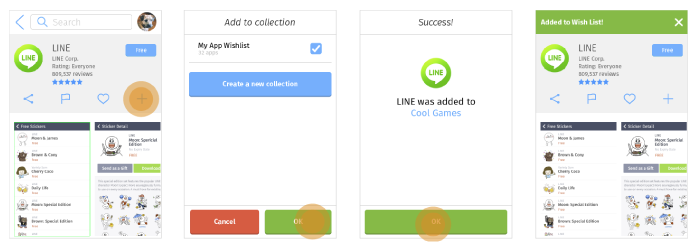
- App listing page
- The add to collection icon appears on the app details screen alongside share, flag and upvote
- When user selects the icon, a modal opens
- Add to collection modal
When user selects “OK”, the Collection selected confirmation appears. - Confirmation
- The confirmation should contain:
- App icon
- App name
- Name of collection the app was added to
- The confirmation should be “[App Name] was added to [Collection Name]”
- [Collection Name] should be a link to the collection landing page
- The confirmation should contain:
- App listing page, with confirmation message
- When the confirmation message is dismissed by selecting “OK”, the user should return to the app details screen.
- The confirmation message should be “Added to [Collection Name]!”
Add App To New Collection

- The first step is viewing the App details screen and clicking the Add to collection button. This step is detailed in the previous section: Add To Existing Collection.
- Add to collection modal
Instead of selecting the name of a collection, user selects the Create a new collection button and is taken to Create collection. - Create collection
- Collection name is required
While this field is selected, pressing the Return/Enter key on the phone keyboard is the equivalent of saying “go to the next field”. The next field is Collection Description. - Collection description is optional
While this field is selected, pressing the Return/Enter key on the phone keyboard is the equivalent of saying “dismiss the keyboard”. - Make visible to all
User can choose to make the collection publicly visible on the Marketplace. Visibility should be turned on by default.
- Collection name is required
- Collection ready
- When the user has entered a Collection name, the "Create" button is enabled
- When the user selects "Create" the user should return to the Add to collection modal.
- Add to collection modal, with new collection added
- The newly added collection should be the second item on the page, listed directly after the app wish list.
- The newly added collection should be selected by default.
- The user can select multiple additional collections to add the app to.
- User clicks "OK" to complete task
- Confirmation
The confirmation message is exactly the same as what was outlined in the previous section. However, if app was added to multiple collections, the confirmation message should be “[App Name] was added to [Collection Name 1], [Collection Name 2] and [Collection Name 3]”